OneASP Pro User Manual
Product Introduction
- 24-bit analog-to-digital converter that performs calibration and temperature compensation for offset, sensitivity, and temperature-induced nonlinearity.
- Maximum airspeed measurement of 439.9 km/h, meeting the airspeed measurement requirements for drones from low speed to subsonic speeds.
- Uses DroneCAN bus communication, offering long transmission distance and strong anti-interference capability.
- Adopts a twist-lock structure to ensure silicone tubes do not loosen.
Product Specification Table
| Parameter | Value |
|---|---|
| Airspeed Measurement Range | 0~439.9 km/h (122.2 m/s) (@15℃ 101325Pa standard atmospheric conditions) |
| Barometer | Yes |
| Total Error Band | ±0.15% FS |
| Temperature Drift Performance | Low temperature drift, high accuracy |
| Silicone Tube Locking Structure | Yes |
| Interface Type | Automotive-grade 04R-JWPF-VSLE-S |
| Communication Protocol | DroneCAN bus communication, strong anti-interference capability |
| Flight Controller Compatibility | ArduPilot and PX4 flight controllers |
| Operating Voltage | 4.7 - 5.3 V |
| Operating Temperature | -20℃ ~ 85℃ |
| Housing Material | Aviation aluminum |
| Weight | 40 g |
| Dimensions | 78.6 × 39 × 15 mm |
ArduPilot Airspeed Sensor Enablement and Calibration Tutorial
CAN Interface Configuration
Run Mission Planner and navigate to [Config] > [FULL Parameter List] interface. Set the following parameters, save, and restart the flight controller.
When connected to the flight controller's CAN1 interface:
CAN_P1_DRIVER = 1CAN_D1_PROTOCOL = 1
When connected to the flight controller's CAN2 interface:
CAN_P2_DRIVER = 1CAN_D2_PROTOCOL = 1
Airspeed Sensor Setup
ARSPD_TYPE = 8(Set to UAVCAN type)ARSPD_USE = 1(Enable airspeed sensor)
Airspeed Zeroing (Offset Calibration)
⚠️ Note
The OneASP Ultra offers consistency advantages in general environments. This step can be skipped by settingARSPD_SKIP_CAL = 1.
Manual Zeroing Steps
- Connect Mission Planner to the flight controller.
- Place the airspeed sensor in a wind-free environment.
- Navigate to the [Flight Data] > [Actions] tab.
- In the first checkbox, select "Preflight Calibration".
- Click the "Do Action" button.

Pre-Flight Check
- Static Check: In a wind-free state, the airspeed value should fluctuate within the range of 0~3 m/s. If it exceeds the range, re-perform the airspeed zeroing.

- Dynamic Check: Hold the pitot tube and blow into it to confirm that the airspeed value changes with airflow.
Airspeed Auto-Calibration
Parameter Setting
ARSPD_AUTOCAL = 1(Enable auto-calibration)
Calibration Method (Choose One)
Method 1: FBWA Mode Calibration
- Take off in
QStabilizeorQLoitermode. - Switch to
FBWAmode. - Fly the drone in circles for about 5 laps.
- Wait for the "Calibration complete" message in the ground station message bar.
- After landing, set
ARSPD_AUTOCALback to 0.
Method 2: Loiter Mode Calibration (Suitable for beginners)
⚠️ Note: Do not perform this in high-wind environments.
- Set parameters:
ARSPD_USE=1andARSPD_TYPE=8. - After takeoff, use
Loitermode to circle about 5 laps. - Wait for the calibration completion prompt, then land.
- Set
ARSPD_AUTOCALback to 0.
PX4 Firmware Airspeed Sensor Configuration and Calibration Tutorial
Hardware Connection
Connect the OneASP L10D airspeed sensor to the flight controller's CAN1/CAN2 interface.
Parameter Setting
After flashing the PX4 firmware onto the flight controller, connect to the QGroundControl (QGC) ground station and set the following parameters in the parameter table:
- UAVCAN_ENABLE → Set to
Sensors automatic Config - UAVCAN_SUB_ASPD → Set to
enable - UAVCAN_SUB_DPRES → Set to
enable
Restart and Notes
Restart the flight controller after settings are applied.
⚠️ Important Note: A memory card must be installed in the flight controller for the airspeed sensor function to work properly.
Dual Airspeed Sensor Redundancy Configuration
When two airspeed sensors are installed on the drone, the data switching strategy can be configured via parameters:
- ASPD_PRIMARY → Configure the primary airspeed sensor data source.
Working Principle:
- The flight controller prioritizes checking whether the primary airspeed sensor data is normal.
- If the primary airspeed sensor data is abnormal or fails the check, it automatically switches to the secondary airspeed sensor.
- This ensures airspeed data reliability and enhances flight safety.
Airspeed Calibration Process
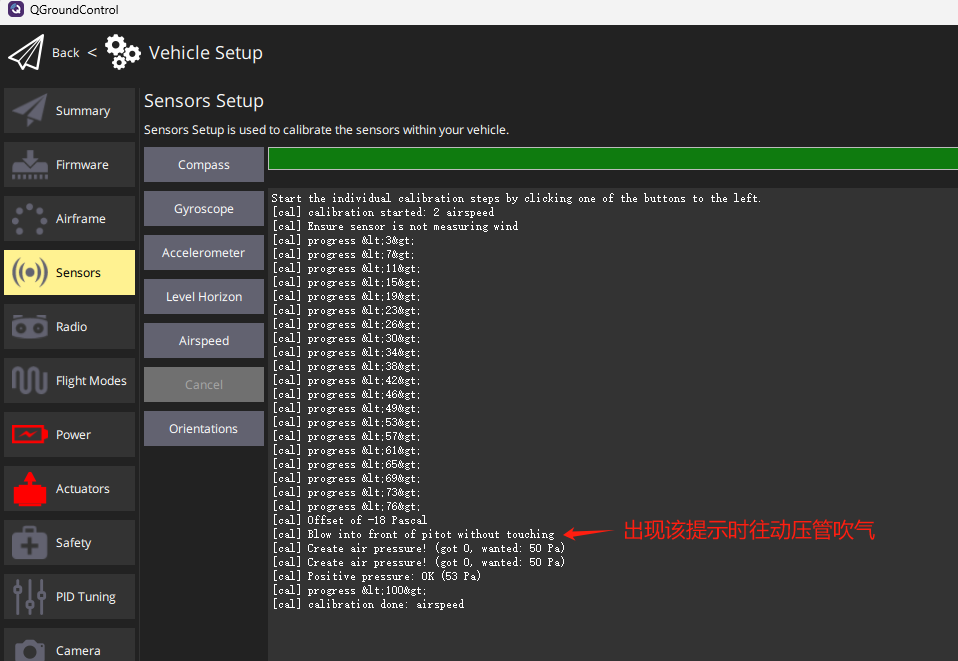
Follow these steps in QGroundControl:
Calibration Steps
- Navigate to Vehicle Setup → Sensors → Select Airspeed.
- Click the airspeed sensor button to start calibration.
- Protect the sensor from wind (cover the pitot tube with your hand), being careful not to block any holes.
- Click "OK" to begin calibration.
- Wait for the prompt "blow into front of probe without touching".
- Blow into the front of the pitot tube; the prompt will display
process <100>. - Wait for the prompt indicating calibration is complete.
;}.cls-2{fill:%230868f7;}.cls-3{fill:url(%23未命名的渐变_44);}.cls-4{fill:%23333;}%3c/style%3e%3clinearGradient%20id='未命名的渐变_8'%20x1='33.73'%20y1='100.61'%20x2='-0.03'%20y2='-1.06'%20gradientUnits='userSpaceOnUse'%3e%3cstop%20offset='0'%20stop-color='%237ae9fb'/%3e%3cstop%20offset='0.67'%20stop-color='%232b90f8'/%3e%3cstop%20offset='1'%20stop-color='%230868f7'/%3e%3c/linearGradient%3e%3clinearGradient%20id='未命名的渐变_44'%20x1='27.86'%20y1='18.67'%20x2='68.36'%20y2='22.22'%20gradientUnits='userSpaceOnUse'%3e%3cstop%20offset='0'%20stop-color='%235ac7f2'/%3e%3cstop%20offset='1'%20stop-color='%230868f7'/%3e%3c/linearGradient%3e%3c/defs%3e%3cpath%20class='cls-1'%20d='M29,28.74V81.91l-9.51-3.68v0L8.52,74A7.17,7.17,0,0,1,4,67.32V24.54A3.76,3.76,0,0,1,9.08,21Z'/%3e%3cpath%20class='cls-2'%20d='M68.09,78.07a13.15,13.15,0,0,1-17.9,12.06L29,81.91h0V28.74L50.19,37A13.17,13.17,0,0,0,68.08,25.3h0Z'/%3e%3cpath%20class='cls-3'%20d='M68.08,25.3a13.19,13.19,0,0,1-6.73,10.87A13.09,13.09,0,0,1,50.19,37L29,28.74V6A3.76,3.76,0,0,1,34.1,2.52l25.59,9.91A13.22,13.22,0,0,1,68.08,25.3Z'/%3e%3cpath%20class='cls-4'%20d='M129.06,81.76a4.33,4.33,0,0,1-3.19-1.31,4.4,4.4,0,0,1-1.31-3.24V56.86H97.65V77.21a4.36,4.36,0,0,1-1.35,3.2A4.68,4.68,0,0,1,93,81.76a4.32,4.32,0,0,1-3.19-1.31,4.37,4.37,0,0,1-1.32-3.24V27.27A4.58,4.58,0,0,1,89.83,24a4.59,4.59,0,0,1,7.82,3.27V48.15h26.91V27.27A4.58,4.58,0,0,1,125.91,24a4.59,4.59,0,0,1,7.82,3.27V77.21a4.37,4.37,0,0,1-1.36,3.2A4.65,4.65,0,0,1,129.06,81.76Z'/%3e%3cpath%20class='cls-4'%20d='M163.77,81.66c-6.57,0-11.76-1.92-15.44-5.7s-5.54-9.07-5.54-15.74a26.76,26.76,0,0,1,2.09-10.43,17.72,17.72,0,0,1,6.67-8.06,19.15,19.15,0,0,1,10.68-2.95,19,19,0,0,1,10.46,2.8,18.7,18.7,0,0,1,6.55,7.36,22.53,22.53,0,0,1,2.36,10.28A4.51,4.51,0,0,1,177,63.77H152.23a10.8,10.8,0,0,0,3.49,6.65c2,1.68,4.88,2.52,8.66,2.52a22.25,22.25,0,0,0,7.54-1.21c.74-.3,1.55-.67,2.37-1.07a3.75,3.75,0,0,1,1.84-.4,4.09,4.09,0,0,1,3,1.15,4,4,0,0,1,1.12,3,4.38,4.38,0,0,1-2.58,3.82,32.34,32.34,0,0,1-6.36,2.61A28.67,28.67,0,0,1,163.77,81.66ZM172.4,55.9a9.72,9.72,0,0,0-1.63-4.56A9.9,9.9,0,0,0,167,48a10.38,10.38,0,0,0-4.64-1.14,12,12,0,0,0-4.77,1.06,9.54,9.54,0,0,0-4.89,5.66,11.78,11.78,0,0,0-.51,2.3Z'/%3e%3cpath%20class='cls-4'%20d='M193,81.64a4.49,4.49,0,0,1-4.51-4.55V27.28A4.58,4.58,0,0,1,189.84,24a4.48,4.48,0,0,1,3.28-1.36A4.36,4.36,0,0,1,196.35,24a4.46,4.46,0,0,1,1.31,3.31V77.09a4.34,4.34,0,0,1-1.35,3.2A4.67,4.67,0,0,1,193,81.64Z'/%3e%3cpath%20class='cls-4'%20d='M263.79,81.71a5.7,5.7,0,0,1-4.2-1.74,5.76,5.76,0,0,1-1.73-4.19V27.37a4.58,4.58,0,0,1,1.35-3.27A4.59,4.59,0,0,1,267,27.37V72.53h24a4.58,4.58,0,0,1,3.27,7.82A4.66,4.66,0,0,1,291,81.71Z'/%3e%3cpath%20class='cls-4'%20d='M424.48,81.74a4.71,4.71,0,0,1-2.71-.88,5.43,5.43,0,0,1-1-1l-.07-.09-12.41-17-5.41,5v9.44a4.31,4.31,0,0,1-1.36,3.19,4.66,4.66,0,0,1-3.3,1.36A4.29,4.29,0,0,1,395,80.42a4.36,4.36,0,0,1-1.32-3.23V27.37A4.58,4.58,0,0,1,395,24.1a4.52,4.52,0,0,1,6.58.12,4.54,4.54,0,0,1,1.24,3.15V56.31l17.72-16.38.05,0a4.8,4.8,0,0,1,2.94-1.11,4.4,4.4,0,0,1,3.27,1.2,4.57,4.57,0,0,1,1.2,3.27,4.44,4.44,0,0,1-.77,2.33,7.45,7.45,0,0,1-1.43,1.65l-11,9.64,13.34,17.68a5,5,0,0,1,1,2.71,4.12,4.12,0,0,1-1.36,3.24A4.64,4.64,0,0,1,424.48,81.74Z'/%3e%3cpath%20class='cls-4'%20d='M317.93,81.76a21.5,21.5,0,1,1,21.17-21.5A21.37,21.37,0,0,1,317.93,81.76Zm0-34.1a12.61,12.61,0,1,0,12.42,12.6A12.52,12.52,0,0,0,317.93,47.66Z'/%3e%3cpath%20class='cls-4'%20d='M212.18,101.22a4.12,4.12,0,0,1-3.05-1.26,4.17,4.17,0,0,1-1.26-3.1V43.34a4.37,4.37,0,0,1,1.3-3.14,4.26,4.26,0,0,1,3.13-1.3,4.19,4.19,0,0,1,3.1,1.26,4.32,4.32,0,0,1,1.26,3.16,20.77,20.77,0,0,1,13-4.54,21.51,21.51,0,0,1,0,43,20.51,20.51,0,0,1-13-4.57V96.86a4.15,4.15,0,0,1-1.3,3.06A4.5,4.5,0,0,1,212.18,101.22Zm17.43-53.63c-6.23,0-12.93,4.11-12.93,12.72a12.73,12.73,0,0,0,25.46,0A12.71,12.71,0,0,0,229.61,47.59Z'/%3e%3cpath%20class='cls-4'%20d='M365.76,81.76a21.5,21.5,0,1,1,21.18-21.5A21.37,21.37,0,0,1,365.76,81.76Zm0-34.1a12.61,12.61,0,1,0,12.42,12.6A12.52,12.52,0,0,0,365.76,47.66Z'/%3e%3c/svg%3e)